
The Phantom Machinist
A bit of a disaster today. I had cut out all the pieces of the bodice and the associated flat lining pieces and had just completed sewing all the fashion fabric pieces that make up the back of the bodice to their lining pieces. Popping out to the kitchen to microwave some tea, I heard the sound of the sewing machine slowly getting up to speed! It seems that the 1950s foot controller has failed.
I've ordered a replacement controller but it is heading to that debate of wondering if it is more sensible to get a new machine.
A new machine would have clever stuff such as reverse, zig-zag stitch, automatic button holing etc, etc.
It would also feature lots of plastic and flexible bits that shouldn't be flexible.
My 1939 singer is made of cast iron, with machined parts and proper bearings. Its possible to service it. I've sewn through 6 layers of tent canvas with it.
Pah!
Victorian Project
-
bound_jenny

- Moderator
- Posts: 10268
- Joined: 09 Dec 2007, 12:37
- Location: Montreal, Canada, Great Kinky North
Re: Victorian Project
Don't even think of replacing it with something else! That thing is a tank! As you mentioned, it will sew through almost anything (probably leather too), can still be serviced because parts are still available, and there are NO plastic or other biodegradable parts inside that can go poof when you a) least expect it and b) least want it.
If you do get a modern one, use it for small or specialized jobs. But keep that old Singer. Everyone I know who has one (from a now defunct corset forum) would never trade it for a recent machine. They swear by their old tanks because they'll breeze through jobs that will jam or break the new ones.
Jenny.
Helplessness is a doorway to the innermost reaches of the soul.
If my corset isn't tight, it just isn't right!
Kink is the spice of life!
Come to the Dark Side - we have cookies!
If my corset isn't tight, it just isn't right!
Kink is the spice of life!
Come to the Dark Side - we have cookies!
Re: Victorian Project
Thanks Jenny. That's pretty much what I needed to hear.
Overnight I have decided not to go for a new machine, but I'm concerned about 50 year old electrics and so I may well replace the motor as well.
Overnight I have decided not to go for a new machine, but I'm concerned about 50 year old electrics and so I may well replace the motor as well.

Re: Victorian Project
try to find a trusty mechanic.
there are "enthusiasts" out there who
can fix almost anything.
usually those aren't working for a manufacturer service, but are freelancers.
just a phone call & the conversation about your "classic" will tell you if he/she is the right one.
a new motor might not be necessary, often replacing the coal @ the coils will do the trick.
[
Re: Victorian Project
I think the problem with the controller was with a capacitor that had got hot and shorted out. I could have replaced this. Whilst it is all recent enough not to have rubber covered cables I feel happier now that all the cables and electrics have been replaced.
No need to call a man in, I have the book of destructions, spanners and a set of feeler gauges. The engine hoist isn't quite necessary, though at 16kg I wonder!
Anyhow. I'm going again all the back pieces of the bodice are assembled (I'm sure there is a special dress making term for assembly) and I'm about to get to work on the front.
Re: Victorian Project
Another Good Day of Progress
I finished the front pieces of the bodice yesterday and joined it all up. Dressing in draws, chemise, corset, bustle, two petticoats, corset cover and underskirt, I tried it on. After the disappointments of the earlier muslin trials, I was very relieved to find that it fits.
This is a long way from a completed garment though. I cut out and made up the sleeves; an additional complexity is that because they are leg of mutton style, there has to be a normal sized sleeve inside to which the mutton outer is gathered back to.
I'm not sure why as at the moment I can see no opportunity to wear this outfit in a public place, but I feel compelled to add decorative details. So there is piping on the princess seams of the back and around the arm holes. This has all been completed.
Still to do:
- Add casings for the boning - it may not be a corset, but is still gets bones... on all the seams and the darts of the front.
- The collar.
- Facings.
- Fitting the sleeves.
- Lots of buttons and button holes
Re: Victorian Project
Quiet is Good
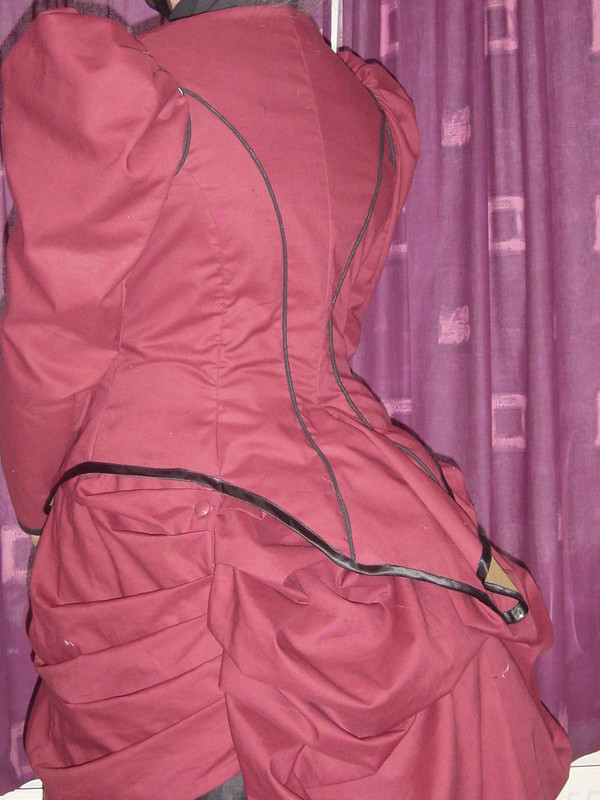
So no post for a week. Partly due to having a visitor, but mostly because I have been too busy stichin'.
Major progress on the bodice. Stitching the boning channels in the back was tricky, but could be done on the machine, so not too bad, The boning on the darts another matter, having to be done mostly by hand. However done it is.
The wrists of the sleeves have had bias binding overlaying the hem. Setting the sleeves into the bodice is also done. I am so glad to still have my 'tank'. Once the top of the sleeve is gathered ( and there is a LOT of the top of the sleeve) there was a big wodge of material that had to go through the machine, but go it did without hesitation (or deviation and only one repetition*).
Next up the fastenings. I had ordered some buttons on-line. The image on the website had ten buttons so I ordered two packs. I received two buttons! Plan B I bought some buttons than can be covered with material to match the garment.
I have a 1950s button holing accessory for the machine. Its a wonderful device driven by the reciprocating needle, then with ratchets and cams it moves the material through the machine. It has a down side. There is a plate to cover the feed dogs so the material isn't pulled through the machine in the normal way. It has a small hole that has to align with the hole in the base of the machine. This cover is held with a screw that has to be tight; VERY tight. At one point whilst setting up the device the base moved causing a needle broke and pieces were heard to land in the next room. I nervously lined up my near finished garment in the machine and it performed flawlessly, doing 20 button holes in about half an hour.
Twenty buttons were attached and it is near completion, only the bottom hem needing to be completed, awaiting further supplies of bias binding.
I spent a long time studying overskirt patterns on the internet, then trying to drape material on the body form without getting any real feeling of getting anywhere, and so I have admitted defeat and ordered a pattern.
* reference to a UK radio show that asks for competitors to talk for a minute without hesitation, repetition or deviation.
Re: Victorian Project
Spray Glue Rocks
Specialist word of the day: Bandeau.
The local sewing machine specialist was able to supply the bias binding to complete the bodice and after a couple of hours pinning and machining that part of the ensemble is now finished.
In the absence of the overskirt pattern (coming from Germany) I turned to something new. No Victorian lady would leave her house without a hat. The sun bonnet I made previously is more 1860s than 1880s and the also the wrong colour. I did some research into the period and found that a common style is based on an oval with a segment taken out of the back to give it some form. The trouble with this type of hat is that they a supposed to sit on an enormous bun at the back, tipping forward. The bandeau is designed to tilt the hat giving the forward slope without the pile of hair to support it.
I skim read a short 1920s book on how to make hats and ignored most of it. The materials aren't really easily available and I don't want to order anything at the moment. What I do have are cereal packets! I glued a couple of pieces together for some rigidity and drew my pattern on them. Its semi circular at the back and elliptical at the front. I carefully curved it over a rolling pin until the sides of the missing segment would join together, then attached them with glued paper.
To hide the underlying material I was covering it with an offcut from the underskirt and this is where my new best product comes in. I have used contact adhesive before and it is a 'get right first time or else' event. The spray glue I found in the cupboard seems to be very different. I sprayed the hat base and the covering material and allowed to dry. Applying the covering I was happy to find that there was scope to move and smooth the material.
The bandeau is made from three layers of paper laminated together (cereal packets don't come in large enough sizes here) with a wire stiffener along the bottom edge, which is the only thing I took from the book I had read. This is covered with the bodice material. The two parts are held together with strips of glue soaked fabric which can be covered in a lining, if I get around to it.

2015-09-30 22.14.00 by Audrey Cooper, on Flickr
Front view

2015-09-30 22.14.09 by Audrey Cooper, on Flickr
Back view
All ready to be covered in feathers, ribbons, flowers and dead birds!
Specialist word of the day: Bandeau.
The local sewing machine specialist was able to supply the bias binding to complete the bodice and after a couple of hours pinning and machining that part of the ensemble is now finished.
In the absence of the overskirt pattern (coming from Germany) I turned to something new. No Victorian lady would leave her house without a hat. The sun bonnet I made previously is more 1860s than 1880s and the also the wrong colour. I did some research into the period and found that a common style is based on an oval with a segment taken out of the back to give it some form. The trouble with this type of hat is that they a supposed to sit on an enormous bun at the back, tipping forward. The bandeau is designed to tilt the hat giving the forward slope without the pile of hair to support it.
I skim read a short 1920s book on how to make hats and ignored most of it. The materials aren't really easily available and I don't want to order anything at the moment. What I do have are cereal packets! I glued a couple of pieces together for some rigidity and drew my pattern on them. Its semi circular at the back and elliptical at the front. I carefully curved it over a rolling pin until the sides of the missing segment would join together, then attached them with glued paper.
To hide the underlying material I was covering it with an offcut from the underskirt and this is where my new best product comes in. I have used contact adhesive before and it is a 'get right first time or else' event. The spray glue I found in the cupboard seems to be very different. I sprayed the hat base and the covering material and allowed to dry. Applying the covering I was happy to find that there was scope to move and smooth the material.
The bandeau is made from three layers of paper laminated together (cereal packets don't come in large enough sizes here) with a wire stiffener along the bottom edge, which is the only thing I took from the book I had read. This is covered with the bodice material. The two parts are held together with strips of glue soaked fabric which can be covered in a lining, if I get around to it.
2015-09-30 22.14.00 by Audrey Cooper, on Flickr
Front view
2015-09-30 22.14.09 by Audrey Cooper, on Flickr
Back view
All ready to be covered in feathers, ribbons, flowers and dead birds!
Last edited by Audrey_CD on 04 Oct 2019, 14:34, edited 1 time in total.
Re: Victorian Project
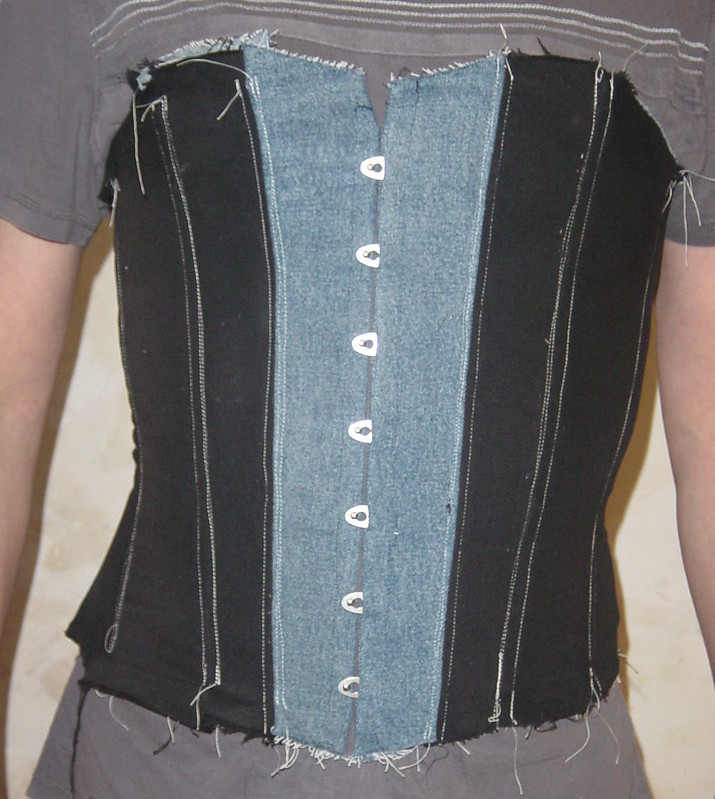
Come on Postie!
Still no pattern. So I have started on the mock up of the corset.

2015-10-01 00.30.07 by Audrey Cooper, on Flickr
Busk set into the front panels following an excellent tutorial from Sydney Eileen
The mock up is made from recycled denim (from my old jeans) which won't match. The final article will be made from a heavy duty cotton twill because I'm too tight to spring for coutil.
One of those stupid things. I've found that I can put the bodice on without a corset. Admittedly there should be quite a few layers on between corset and bodice which must take up some space, but I have realised that what I have isn't really a body shaping device. If the corset I'm making works I shall be irritated as re-cutting the bodice would be a nightmare. However, I can rationalise this by considering that my sewing skills would not have been good enough at the start of this to have made the corset first, when measurements for the other garments needed to be taken and I didn;t have the confidence to start a corset.
Still no pattern. So I have started on the mock up of the corset.
2015-10-01 00.30.07 by Audrey Cooper, on Flickr
Busk set into the front panels following an excellent tutorial from Sydney Eileen
The mock up is made from recycled denim (from my old jeans) which won't match. The final article will be made from a heavy duty cotton twill because I'm too tight to spring for coutil.
One of those stupid things. I've found that I can put the bodice on without a corset. Admittedly there should be quite a few layers on between corset and bodice which must take up some space, but I have realised that what I have isn't really a body shaping device. If the corset I'm making works I shall be irritated as re-cutting the bodice would be a nightmare. However, I can rationalise this by considering that my sewing skills would not have been good enough at the start of this to have made the corset first, when measurements for the other garments needed to be taken and I didn;t have the confidence to start a corset.
Last edited by Audrey_CD on 04 Oct 2019, 14:35, edited 1 time in total.
Re: Victorian Project
And it's
FINISHED!
The postman turned up with the pattern on Friday, so Friday evening was spent cutting out, pleating and stitching. Time was spent panicking that the swags in the front apron wouldn't stay. Button holes were made in the overskirt. Button holes were made in the underskirt. Button holes were made in the petticoat.
A lot of time was spent on Saturday in a fruitless attempt to find suitable stuff to put on the hat. Flowers and leaves were made.
Finally the hidden tapes were fastened underneath the overskirt which resolved the limp swags.
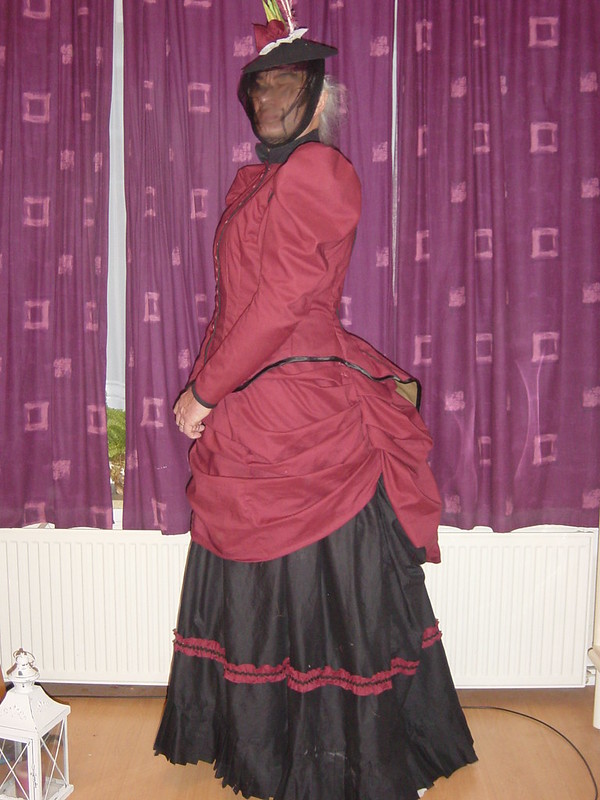

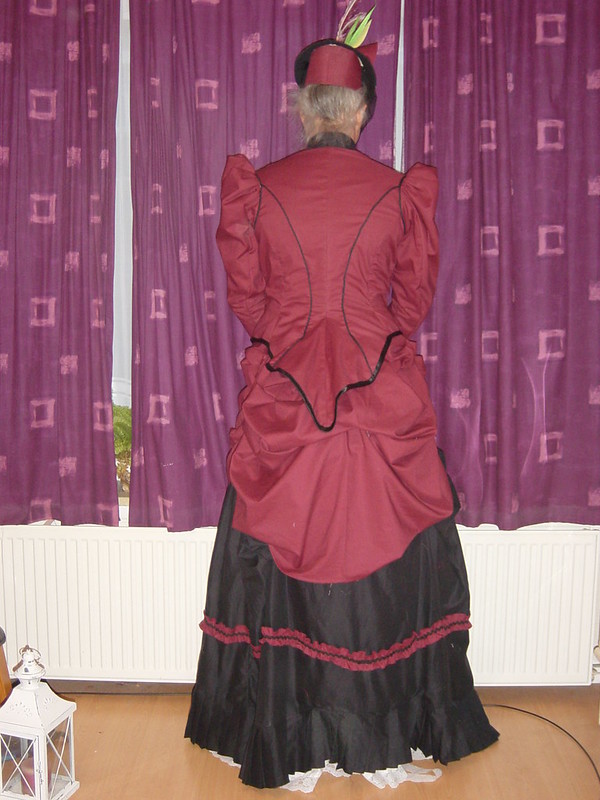


[url=https://flic.kr/p/2hpZuMH]DSC00044 by Audrey Cooper, on Flickr
(Click on the first image to see more pictures)
I just need to find an occasion (and nerve) to wear it.
FINISHED!
The postman turned up with the pattern on Friday, so Friday evening was spent cutting out, pleating and stitching. Time was spent panicking that the swags in the front apron wouldn't stay. Button holes were made in the overskirt. Button holes were made in the underskirt. Button holes were made in the petticoat.
A lot of time was spent on Saturday in a fruitless attempt to find suitable stuff to put on the hat. Flowers and leaves were made.
Finally the hidden tapes were fastened underneath the overskirt which resolved the limp swags.
[url=https://flic.kr/p/2hpZuMH]DSC00044 by Audrey Cooper, on Flickr
(Click on the first image to see more pictures)
I just need to find an occasion (and nerve) to wear it.
Last edited by Audrey_CD on 04 Oct 2019, 14:46, edited 2 times in total.
-
bound_jenny
- Moderator
- Posts: 10268
- Joined: 09 Dec 2007, 12:37
- Location: Montreal, Canada, Great Kinky North
Re: Victorian Project
That's beautiful! I love it! 
The back view really is nice.
You rock!

Jenny.
The back view really is nice.
You rock!
Halloween is coming up - a perfect occasion to wear it, proudly! Don't wimp out, be a real Victorian Lady!Audrey_CD wrote:I just need to find an occasion (and nerve) to wear it.
Jenny.
Helplessness is a doorway to the innermost reaches of the soul.
If my corset isn't tight, it just isn't right!
Kink is the spice of life!
Come to the Dark Side - we have cookies!
If my corset isn't tight, it just isn't right!
Kink is the spice of life!
Come to the Dark Side - we have cookies!
-
boundsissy

- **
- Posts: 196
- Joined: 07 Jul 2010, 01:51
- Location: sub of Chicago
Re: Victorian Project
Absolutely perfect, you did a fantastic job. 
 (i'm jealous, I would love a dress like that)
LOVE TO ALL
-
wishful-thinking
- *
- Posts: 12
- Joined: 02 Sep 2012, 16:21
Re: Victorian Project
I lurk most often and post very little. I have been following this project from the start. Audrey, what you have accomplished is incredible. The finished piece is awe- inspiring. You have done a wonderful job. 
Re: Victorian Project
I'm not sure whether to keep this here or move it to the DIY corset thread. May be one of the moderators could do the necessary if necessary?
I can't begin to describe how much more comfortable it is compared to the commercial ones. Because I have little in the way of hips, the commercial ones pushed my stomach down below the waist, and the bottoms of the bones would stick out. The commercial one pushed too hard on the bottom of the rib cage and only seemed to fit on the waist, which I guess makes sense as that is the only measurement involved.
The new one caresses in a firm manor; my stomach is pushed in rather than down. There is little pressure on hips or chest as these are not intended to be compressed.
Corset front - mockup by Audrey Cooper, on Flickr

Corset back - mockup by Audrey Cooper, on Flickr
Remember this is only a mock up to check the fit, so there are loose threads and the top and bottom edges haven't been finished.
After a pause of a couple of weeks (nothing to do with another temper tantrum after putting six panels in the front and only five in the back one one side) the mock up of the custom fit corset is complete.Audrey_CD wrote:Come on Postie!
Still no pattern. So I have started on the mock up of the corset.
2015-10-01 00.30.07 by Audrey Cooper, on Flickr
Busk set into the front panels following an excellent tutorial from Sydney Eileen
The mock up is made from recycled denim (from my old jeans) which won't match. The final article will be made from a heavy duty cotton twill because I'm too tight to spring for coutil.
One of those stupid things. I've found that I can put the bodice on without a corset. Admittedly there should be quite a few layers on between corset and bodice which must take up some space, but I have realised that what I have isn't really a body shaping device. If the corset I'm making works I shall be irritated as re-cutting the bodice would be a nightmare. However, I can rationalise this by considering that my sewing skills would not have been good enough at the start of this to have made the corset first, when measurements for the other garments needed to be taken and I didn;t have the confidence to start a corset.
I can't begin to describe how much more comfortable it is compared to the commercial ones. Because I have little in the way of hips, the commercial ones pushed my stomach down below the waist, and the bottoms of the bones would stick out. The commercial one pushed too hard on the bottom of the rib cage and only seemed to fit on the waist, which I guess makes sense as that is the only measurement involved.
The new one caresses in a firm manor; my stomach is pushed in rather than down. There is little pressure on hips or chest as these are not intended to be compressed.
Corset front - mockup by Audrey Cooper, on Flickr
Corset back - mockup by Audrey Cooper, on Flickr
Remember this is only a mock up to check the fit, so there are loose threads and the top and bottom edges haven't been finished.